20 Cute Nail Designs for Birthday
Have you got a birthday coming up? Whether it is your own or a pal’s, not only does your outfit have to be on point, but your make up too – and that includes your nails, girls. Like an accessory, they can totally transform an outfit and make a statement. There are styles for everyone in this list, for those who love their sparkles to the nail art beginners who aren’t quite at ease with nail art.
1A Touch Of Sparkle!
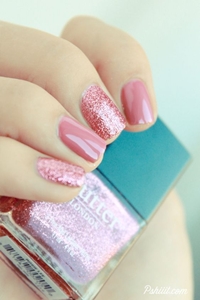
This look is party-ready and will look stunning with that lace dress or your black romper. Take a matte nail varnish and paint all your nails with this colour, then chose a random finger nail on each hand to paint with a glittery nail varnish of a similar colour, we recommend chosing pastel pinks or blues. The glitter remains subtle and this style is really easy to do, perfect if you’ve got little time left to finish getting ready or you’re on the go! The glitter nail varnish in this photo is from Butter London, they have got a wide choice of sparkly nail varnishes, so there is no excuse!
2Marc Jacobs Inspired
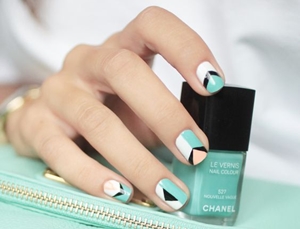
We fell in love with this multicolored style inspired by a piece from the summer 2014 Marc Jacobs collection. Not only is it literally straight from the catwalk but these shades will be relevant. How do you get these amazing shapes? It is pretty simple! Beauty bloggers and nail art experts cut out the shapes they recquire from tape and remove them from their nails once the polish is dry! Simple, easy and effective! Wear this with a pretty white summery dress and a straw hat and you’re good to go!
3White Nails
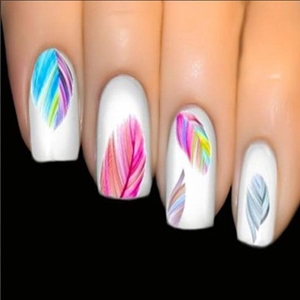
Chose wisely the white nail varnish you use and how you apply it as if you put a huge splodge on you will face looking like you grabbed the Tippex! Apply each layer slowly and always wait until it is dry. White nails are not tacky at all and can add colour to an all black or monochrome outfit! What we advise you to do, if you think they are looking a bit bare, is to add nail stickers like these lush feather stickers. Yet again, minimal effort but maximum effect! Everyone will be asking you how you managed to get your nails so perfect!
4Black And Gold
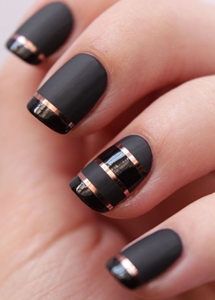
These are gorgeous and sophisticated. Thanks to the use of matte and lacquer nail varnishes – this adds texture to the look and cut out tiny stripes of gold paper and glue them on with nail glue to separate the different sections of matte and lacquer nail polish. If you’ve got a dressy birthday party, you should be inspired by this!
5The French Manicure
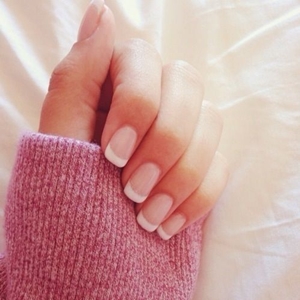
If you’re looking for cute simple nail designs, you can’t go wrong with the classic French manicure! This is ideal if you’re not sure if it is a dressed-up or dressed-down birthday party, or if it is in fact your birthday and you’re just down at the mall splashing your birthday cash on a new wardrobe! It’s practical, easy, and can be worn everyday! Sometimes the simplest styles are the classiest.
6How To Get The Perfect French Manicure
1) Prepare your nails: grab a coton pad and a remover and take off all your old polish, even the tiniest bits, because obviously you will be able to see everything through the clear nail varnish.
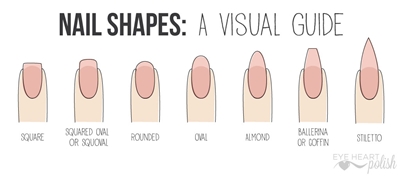
2) Trim your nails into your desired shape. If you are not sure, check out the shape chart we have found! Don’t forget to file and buff them too, this is a vital step that will determine the outcome for your manicure!
3) Soak your nails in a bowl of warm water to soften your cuticles, this will make it easier to push them back. Then, dry them off with a towel.
4) Gently push back your cuticles and trim off any dead skin.
5) Apply the base coat by painting the first stripe down the center of the nail, then two more stripes on either side to make sure the application is even. After this, fill in the whole nail with the same polish.
6) Paint your nail tips with white polish, the amount of white you use should correspond to the amount of whiteness you have on your real nail, otherwise it will look super tacky and make your nails look tiny!
7) Finally, add a clear coat of varnish over all the nails to protect them and also help them last longer.
7Fake Nails
Fake nails are the solution if all these tutorials are getting you panicky. Buy some classy matte fake nails and trim them to your size so they are not overpowering or claw-like! They always make you look like you’ve made an effort when in fact there is very little to do. You can concentrate on getting your hair and make up on point!
8Confetti

What is a party without confetti and balloons? You can quite literally have birthday-ready nails by adding little bits of confetti to your nails before adding the final clear coat of polish. No crazy colours, just a French manicure with tiny confetti, who said nail art had to be hard?
9Neon Colours
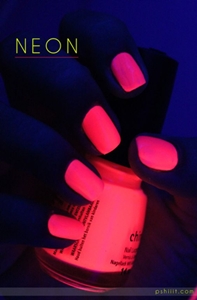
Pastel colors during the day, and at night, under the club lights, watch your nail become neon! This is perfect for a night out on the tiles with friends for birthday celebrations! This brand is China Glaze and they do a large variety of colours that can be seen in the dark, no one will be able to keep their eyes off you on the dancefloor!
10Floral
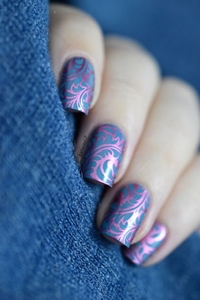
Impressive, huh? But yet again, not difficult! If you love patterns but you haven’t got the patience to do them with a nail art brush (like quite a few of us), just buy a stamping kit, you chose the patterns you want and all you have to do is apply the polish over the pattern you want, just like a stencil set!
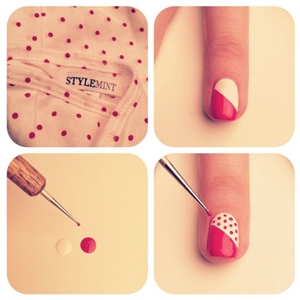
11A French Manicure With A Difference
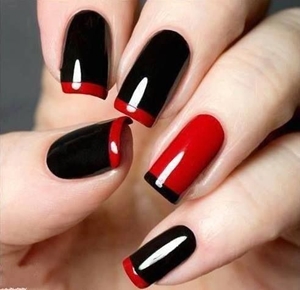
Why not try a French manicure with different colours? Black nail varnish isn’t just for 2002 Avril Lavigne! A splash of red is a game changer, and will transform your nails from “uuh!” to “wow!”. You can wear this for a family birthday celebration or for a party with friends, it’s the balance you need between dressy and casual!
12Nail Transfers
If you’re into cute easy nail designs, Nail transfers are another easy solution to have Pinterest-worthy nails without having to slave away in the bathroom. Nail transfers are really quick but very fiddly, so those with very little patience beware!
Hold the nail decal in a small bowl of water with tweezers for thirty seconds before sliding the white paper off and placing it on the nail.
13Get A Bit Technical
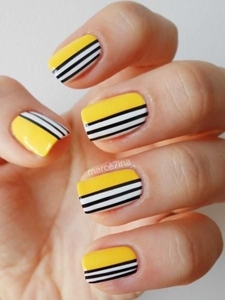
If nail art is one of your passions, try this design out. We love how it brings together a beautiful pairing of yellow and black and white stripes! Use Peel Off to avoid getting polish all over your fingers. Have you ever seen nail art tutorials on social media where the varnish can be peeled off like tape? This is the product they use – apply it around the finger nail and peel it off when you have finished to get a clean result!
14Fairy Dust
This is a must for the party princess, but unlike the first style, there is a lot less glitter! You can use a sponge to add the glitter to get that fairy dust effect. This blue combination reminds of Disney’s Cinderella – you shall be the belle of the ball!
15Mix And Match
Mix and match different styles and use the same colour scheme to not make them look too crazy! Throw in a monochrome nail so that the patterns don’t clash too much! This inspiration we found totally reminds us of wrapping paper!
16The Birthday Present
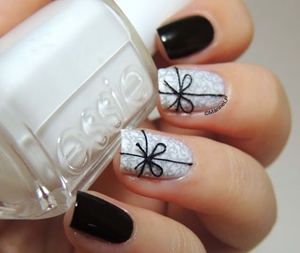
Use a nail art paintbrush to draw thin lines and a bow – your nails will look gift-wrapped! It’s a great idea for birthdays but also for Christmas, just change the colours to red and white for the winter festivities!
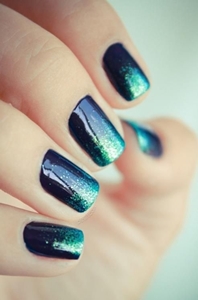
17Galaxy Nails
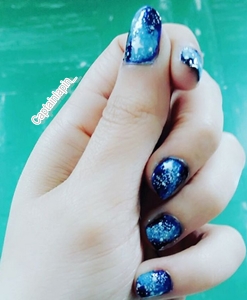
Want to make your nails look out of this world? Here is how you get this stunning result:
1) Prepare your nails, even if this time you are not using clear nail varnish, this will make sure everything is smooth and even. Add a clear coat to protect and seal the nail.
2) Paint the background colour – we recommend a deep dark colour like black, dark purple or blue.
3) Add small specks of glittery nail varnish to create an effect of distant stars. No big flecks allowed!
4) Chose your galaxy colors – find a picture and chose the two to three colors that you like, galaxies can be of any shade really!
5) Cut a tiny bit of sponge off and with some tweezers, dab the colours on one by one with the sponge.
6) Cover the nail with a transparent polish with a hint of glitter in it, then add larger glitter chunks.
7) With a nail art brush or a dotting tool, add small white specks to create an impression of distance. You can also draw on stars with a dotting tool but this is optional.
8) Finally, once it is all dry, add a coat of transparent polish to protect the layers.
18Fish Egg Nails
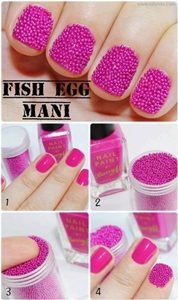
The picture pretty much explains itself, but whilst your nail varnish is still wet you can add little beads like in this tutorial. This adds texture and adds a little excitement into your basic nail varnish and clear coat combo!
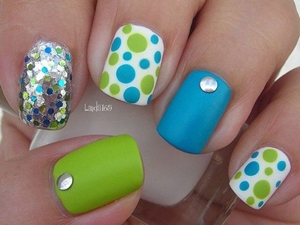
19Spots
Spots are so easy to obtain, use a dotting tool to add little spots to your nails. If you’re just having a quiet night in with the girls for your birthday, this is a cute style to try out whilst having philosophical talks on what you have learnt in the last year. You can add this page of nail tutorials to that list!
20Ombre
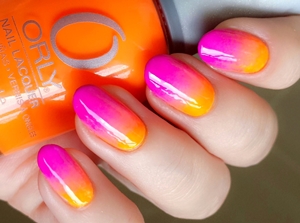
We are always in awe of the nail artists on social media who create this luscious look! Here’s how you do it!
1) Prepare your nails before applying a thin clear coat on all your nails.
2) Paint several layers of base coat over your nails – if you want your nails to dry quicker, apply two thin layers of polish instead one thick one.
3) Paint your ombre colors in straight horizontal lines onto a sponge. The width of the sponge should be that of your nail. The first color should be lighter than the second. Normally, two or three cute nail colors are chosen to create an ombre look. Dip the sponge in water before use.
4) Stamp the colors onto your nails by rolling the sponge from one nail to the other without lifting the sponge – you will get nail varnish over your fingers but you can get this off by using a Q Tip and nail polish remover.
5) Finally, add a top coat of clear polish.
21Nail Stickers

Look how gorgeous these nails look! All you have to do it paint the base coat, the rest is all stickers! Grab a set of stickers from your local beauty store, take them off the wrapping and stick. Then, add a final layer of clear polish to really stick it down!